When I was a little girl, I learned two crafts from my grandmother. One was the craft of making
juice can footstools, and the other was the craft of English paper piecing. Though I doubt Grandma Swan ever knew that she was teaching me English paper piecing. She didn't call it that, and she may never have heard the term. For us, the craft was simply a way to make a patchwork pincushion out of scraps of fabric. I've made many of these pincushions. I made one for my mother for Mother's Day the year I was ten. She still uses it 33 years later. When I was eleven and my mother was making a bridal gown for my brother's fiancée, I made a pincushion from scraps of the white satin of her dress and my mother's old rose mother-of-the-groom dress and gave it to my new sister-in-law for a wedding present. Twenty-one years after that, when my brother and sister-in-law's daughter was getting married in her turn, I made my niece a pincushion from scraps of the only two dresses that were made for her wedding: her younger sister's pink junior bridesmaid dress which my mother made, and my own spring green silk dress, which I made myself. I've also made quite a few pincushions over the years as gifts for friends of mine who sew and craft.
It wasn't until I was in my thirties and I posted some pictures of pincushions I had made to Facebook that a friend of mine told me the craft's proper name. Then a few months ago, I read Tracy Chevalier's
The Last Runaway, in which the English-born female protagonist, Honor Bright, is a skilled, disciplined, and artistic seamstress and quilter, and I recognized her style of quilting as English paper piecing.
Before I began work on this post, I took forty minutes or so to search Pinterest and the internet at large for English paper piecing, and as I had come to suspect, there was much more to the craft than the very limited form of it I learned from my grandmother. Though the hexagon shapes we used were indeed the most common building block, English paper piecers use all sorts of shapes and fit them together to make quilts, cushions, tote bags, placemats, art work and more with an incredible variety of visual effects. I doubt very much that I will ever go so far as to make a quilt with this craft -- I'm not a quilter, and don't even particularly like quilts -- though I think at some point I might use the craft to make some other, smaller items.

But let's look at the latest two pincushions I've made. I wanted to make one for a friend of mine who is just getting into knitting and crafting, and I also decided to make a second one for me, since the one I was using was about 25 years old and rather the worse for the wear. The first step in making these pincushions is to cut out 37 little paper hexagons from any old scrap paper, then 37 larger cloth hexagons from whatever fabric you want to use. I like to make my pincushions from two coordinating colours of fabric, which means I cut out 13 hexagons from one fabric and 24 from the second fabric, but of course you can use as many fabrics as you want in whatever configuration you like.
Next, baste the fabric hexagons over the paper hexagons as I've done from the basted hexagons on the right in the picture above. To do this, you'll fold the fabric over the paper and stitch one corner at a time with one stitch each.

Then sew all the hexagons together by hand. To do this hold two hexagons flat together, right sides in, and stitch one side of the two together. Unfold the two joined hexagons, and stitch a third hexagon to the two of them, holding it flat against each of the first two in turn, and working one little seam at a time. I start with the centre hexagon and work my way out in circles, re-threadng my needle with the appropriate colour thread as necessary. Make your stitches small enough that they can't be seen from the right side, and sew through the fabric only, not the paper.
Next, cut out the backing of your cushion, using the top as a template for it. Then remove the basting stitches and the paper pieces from your patchwork cushion top.
Pin the top of your cushion to its backing, with right sides together. Machine stitch the top and the bottom pieces together, leaving the middle two hexagons of one side open so that you can turn the cushion right side out. You'll need to situate your stitching line just below the end of the hexagon seams on the outside layer.
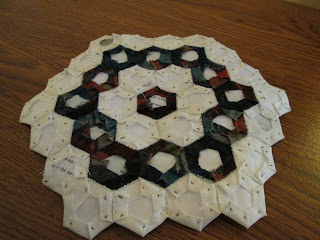
Once the cushion pieces are sewn together, turn them right side out. Stuff them firmly. Slipstitch the opening together. And then... you're done. I'm looking forward to giving my friend her cushion -- hers being the tartan and white one on the left -- and I even bought a little box of pins to go with it. I wanted her to start out her crafting life with some suitable accessories.


